Saturday, December 19, 2015

Zion National Park update


I've been holding off on this print since I've been spending a lot of time with other prints and work.  I decided the other day that I was going to add the areas that will be carved and left as white highlights.  I used the original photo that I altered to black and white to see where all the highlights were.

I used a light blue Sharpie to mark these areas and will start carving away these areas within the next week.

This print will only be two ink colors - grey and black and the white of the paper.

Monday, December 14, 2015

Getting ready for the next reduction print


I started tearing up my paper for my next reduction print.  I start with 22x30 sheets of Canson Edition Paper and use both a large metal ruler and my trusty T-square for tearing the paper down.
My next print, the Heinz Field logo which I started a while back is the next in line and measures 8x10.  I want to have a 1 inch border on all sides so that increases the size from 8x10 to 10x12.  I also leave .5" on the long side so that I can use a 3 hole punch to make holes for the registration pegs I use.

The final paper size is 10 x 12.5 and I can get 4 of those out of each 22 x 30 sheet of paper.
I currently have 16 sheets prepared for the Heinz Field sign, but I'm considering changing that to 20.  

I also need to tear the same size paper for my Zion National Park print as well.

Thursday, December 10, 2015

Oaks Theater update - Light Bulb shadow


The 2nd yellow color finally dried up the other day and it allowed me the chance to print the shadow color of the light bulbs.  The light bulbs are a bright yellow and because of the shadow they turn out more orange.

I used the same yellow that I used on the previous step and simply added red to it.  I wanted to have an orange that was similar in value to the yellow so I simply gathered up my left over ink and stored it inside a small envelope made of aluminum foil until I was ready.


Here is a detail of the bulb highlights and the shadow color.  I'm excited to print the next dark grey color which will cover up anything that isn't light bulb.  If everything goes correctly I should only have 2 more colors to print, though I have a feeling that my sky blue will need to be printed twice.


Saturday, November 28, 2015

Oaks Theater update - Yellow x2


Here's a couple pics from my last printing.  The yellow and white cans with ink ready to be mixed and the inked up lino block.

Oaks Theater update

No pics for this one.  I reprinted the yellow a second time to get it to turn more into a yellow and less of the olive color that it printed in.  They are almost dry and I'm starting to carve away the yellow sections.

Thursday, November 12, 2015

Oaks Theater update - Yellow


After shuffling my feet with this color and knowing that I printed the color out of order I decided today to just print it.  It turned out darker since the yellow has some transparency, but I acutally like the color and plan on using it for the shadow section of the bulbs.

I usually ink the whole block and then print it, but I decided to just print the areas where the color was going to be.

Saturday, November 7, 2015

Zion National Park Linocut (photo) & Oaks Theater update


It's been a little while since I last posted, but I've been working on various projects and working a lot of overtime and my regular job while still trying to maintain a normal life.

I got some clouds into my Zion National Park image and started carving them away a couple days back.  Sadly I like the direction I have the clouds coming from and never considered that it's going to be in reverse.  Maybe I'll like them from that direction too.

Once I finish the clouds, I'll start carving out the white highlights on the side of the mountain.

The Oaks Theater print should be getting it's next layer soon.  I've been waiting for some feedback from some other printmakers about the order of color and hope that I haven't completely messed it up.  So far I haven't heard back from anyone so I may just wind up printing away.

#ZionNationalPark #NationalPark #Mountain #clouds #art #printmaking #linocut #OaksTheater

Monday, October 19, 2015

Updates on Zion National Park and Oaks Theater


Finished tracing the image from Zion in Sharpie.  Next step is to start carving out the white highlights on the mountain side.

As you can see though, there are small circles in the sky area.  These are small indents in the surface of the lino.  I'm currently testing different sky/cloud ideas so that I can carve away those sections.  Since they are indents, they will not print so I have to find a way to remove them.


Finished carving away the area around the vertical line of lightbulbs and around/inside the letters.  The last update under the Oaks Work In Progress tab on this page shows the color progression.

#art #printmaking #linocut #pittsburgh #oakstheater #zionnationalpark #utah #neon

Sunday, October 11, 2015


Zion National Park - 8x10 landscape

I've been interested in trying landscapes for a little while, but didn't have much that I was interested in doing.  On my recent trip to Las Vegas we took a small detour through Zion National Park where my wife took a ton of pics while I drove.

She took a picture of this 

and I decided to try both a 2 color and single color print out of this piece.

I'm going to do a gray and black print and a straight black print.

Wednesday, October 7, 2015

Oaks Theater update


Yikes....I new this would be a little tough, but it's turning out to definitely be harder than I imagined.  Definitely taking my time between these bulbs.

Saturday, October 3, 2015

Heinz Field Sign update


I've just finised carving out the white letters and area surrounding the Heinz Logo on Heinz Field.

My next step for this piece is to tear down my paper and have it completely prepared before printing starts.  I'm considering an edition of 20 for this particular piece.

#art #printmaking #linocut #pittsburgh #pittsburghsteelers #heinz #heinzfield

Neon "B" linocut update


It's probably not my best idea, but I've decided to add an additional color to the Neon B.  I've decided to add a shadow side to the neon tubing.  This is something I probably should have planned for originally, but after printing the grey tubing in the wrong order it got me to thinking that it might look better with a shadowed side.

The ink from the last post is almost dry so I'm just waiting for it to finish before printing the next step.

#art #printmaking #linocut #B #neon #reliefprint


Friday, September 25, 2015

Neon "B" Linocut update


There are times where I'm reminded I'm still learning.  I somehow missed printing the light gray section of the neon tubing early on in this print.  These are printed light to dark and I printed some darker colors before printing the light gray.  The light gray of the tubing looks lavender to both the eye and camera.

I'm wondering if it's just the colors around it playing with my eyes though.  It's sitting next to both the red and yellow and part of me thinks that those colors may be tricking my eyes into seeing a lavender color.

I'm going to push forward with this and hopefully things will work themselves out.

#art #printmaking #linocut #neon #B

Heinz Field Sign update


I finished the inking for the most part.  I'm looking into certain areas that came out with less detail and trying to see what I can add in.

While working on the drawing I also started numbering areas for color.  In effect, it's a color by number.  With so many different areas on this image I figured it'd be best if I put some additional planning into this one before printing starts.

#printmaking #art #HeinzField #heinz #pittsburgh #pittsburghsteelers #steelers

Saturday, September 19, 2015

Heinz Fiend Sign continued


Here's some more work on the Heinz Field lino block.  Working on inking all of the horizontals and coloring in all areas that will be either black or a very dark grey.

Hoping to have the bottom left of the image finished by the end of the night.

#HeinzField #Printmaking #Art #PittsburghSteelers #Linocut

Friday, September 18, 2015

Heinz Field sign


I was working on a new piece right before leaving for Las Vegas.  It's the main sign for Heinz Field which is home to the Pittsburgh Steelers and Pittsburgh Panthers football teams.  I worked on tracing the design over the course of a couple days and then used my etching press to transfer the graphite tracing onto an 8x10 lino block.  I'm currently in the process of tracing the pencil lines over in ultra fine Sharpie Marker.

Hopefully the tracing can be completed with a week or so.  Could probably go quicker, but work is going to get very busy and it slows down my art output rather fast.

I'll keep updating though as I go.

Time to get back to work...

Took a trip out west to Las Vegas last week and was slow making art leading into that trip since I was trying to make sure I was ready.  Got a lot of pictures of neon and signs and hope that maybe some of those will also make nice prints.  Traveled to Zion National Park in Utah, Antelope Canyons in Arizona and the Grand Canyon.  I'm considering attempting to do some landscapes as well and got some nice ones from around Zion that seem like they'd be good subject matter.

Here's a shot from inside Antelope Canyons...if you live out that way and have never been to the Lower Antelope Canyons I cannot recommend it more.


Saturday, August 22, 2015

Oaks Theater update!


Finally got around to printing the next color.  Took a little while, but glad I finally got it printed.


Detail of the two colors side by side.  This image is actually darker than the ink is in person.


Monday, August 17, 2015


"Neon B" - Red Printing

I printed the red layer the other day and have them hanging at the moment to dry.

I'm currently carving away all of the areas intended to be red.  Was hoping to print some of the Oaks Theater this morning, but after working til 5am yesterday I'm afraid that it's going to have to wait for a morning where I'm not up that early.

Friday, August 7, 2015

Neon "B" - Reduction Print Update #3


Printed the 2nd color today and they all turned out pretty well.  This color is nothing more than the orange on the inside of the neon tube.  Should be a pretty simple carve job and easy turn around.  Too bad I need a week for the ink to dry well enough.

Thursday, July 30, 2015

Oaks Theater Update - 1st layer printed!!


Finally got the first layer printed!  This image is slightly bluer than it acutally is.  The regular color is light gray on a bright white paper.  Cannot wait for this layer to dry so that I can print the next layer.

While waiting for it to dry I will now carve away all the areas that are light gray (the color just printed)

Monday, July 27, 2015

Neon "B" - 8x8 - Reduction Print update #2


Printed the first color today of my Neon "B" today.  I was hesitant to print this since it was my first time printing unmounted lino on my home press and wasn't sure how well it was gonna work out.

Seems to have worked out pretty well though.  I printed a total of 10 and plan on an edition of 8 or 9 with 1 or 2 as Artist Proofs.  Taking a couple days away and when I get back I'll start the carving for the next color.

Saturday, July 25, 2015

Neon "B" - 8x8 - Reduction Print


Test print for my neon "B" - 8x8

I've yet to print unmounted linoleum on my etching press and recently made up a registration jig for unmounted and ran a test print today.  I used blue because it's easier to see and I wanted to see whether the pressure I had it set at would create a good solid layer of color.

The pressure is pretty close, but not quite there.  The far left edge of the image is the tone that I'm looking for.  It's lightens a good bit in the middle and the right edge wasn't underneath my plexi so it didn't print hardly at all (due to lack of pressure).

It's a good starting point for working with unmounted lino.

New / Old Lilypad Project - 9x12 Reduction Print


A couple months back I did a quick 5 color Lilypad Reduction Print just to see how it worked out.  Overall it worked out pretty well with some exceptions.  I feel that the prints turned out pretty well though and have considered doing a larger print with oil based inks rather than water based.

I'm using the same image as before (see above), but this time I've enlarged it to a 9x12 rather than a 4x6 that the test was.  Below is the start of the tracing for this project.  As with all of my projects, I'm currently tracing in a 4B pencil and then will pass it through my etching press to transfer the design.


Thursday, July 23, 2015

Oaks Theater Update!!! Started carving!


Finally got my registration jig figured out and drilled the registration holes for both a 1 inch and a 1.5 border.  This poor Oaks Theater has been waiting to be carved for so long and now that the jig is ready I started carving away the white areas!  Woohoo!

Feel free to check out the updated Oaks Theater WIP page.

Cupcake update - Starting over the Black Screen


So after some issues with the way that the original screen looked I decided to start over.  On the left are my tools.....dip pen, drawing fluid and paint brush - One the right is the finished drawing fluid version of the cupcake.

I have currently filled the screen with screen filler and it is in the process of drying.  Should have it washed out soon.

UPDATE:  Right at the end of filling in the screen I accidentally dropped some screen filler into one of the washed out areas.  I tried wiping it out with lots of water and got "most" of it, but when I printed it there were marks where the ink didn't go through (see below).  Time to start over.


2ND UPDATE:  This project is starting to wear me down.  I filled the screen for a third time today and noticed while cleaning my scooper that it looked like there was drawing fluid along the edge.  Turns out that there was.  The humidity must be keeping it somewhat moist.  It was dry to the touch and not even tacky when I put the screen filler in.  After washing out the screen I have large areas of screen filler in what should be my black line areas.  I have to start again.  Washing out the screen now.  I may need to take some time away from this one until the humidity drops and then try again.


Sunday, July 19, 2015

Cupcake Update

Decided this morning that I was not completely happy with the line quality of the final screen for the black outline of the cupcake screenprint.  I am currently washing out that screen and I'm on vacation from work for almost 2 weeks so I should be able to really get things rolling.

Saturday, July 11, 2015

Production and Work In Progress


This is a picture of my ink well and my Amur Tiger linoblock from my printing session the other day.  I printed 17 prints and they are currently hanging and I'm waiting for them to dry.


In the last two days I've also progressed on two other projects.  The Heinz Field sing in mostly traced, but there are some tiny areas that require a sharp pencil and a steady hand.  Almost done here.

Worked on the color separations for my Red Panda as well tonight.  Finished the black key color and tonight worked on identifying the lightest yellow of the fur.

Tuesday, July 7, 2015

New Tiger Block test print!

Above is the new lino block the Amur Tiger that I started a while back.  I wasn't completely happy with the past print so I decided to completely re-do the entire block from scratch.  I did use the same image and was actually able to transfer the pencil tracings from the last block which helped to move things along quicker.

I'm happier with this version of the block, but still not completely sold on it's final look.  Below are the original two...the left was the original and then the re-carved version to it's right.

Definitely trying to get my art making back on track.  I have a lot of blocks to work on and now that my room is mostly back together I plan on ramping up my production.


Friday, July 3, 2015

Getting things ready again.

Got the wall fixed about a week ago and I've been rearranging a bit.  Should be back to printing within a couple days... at most.

Monday, June 22, 2015

Slow work.....

I'm still working on art, but things have slowed down over the last week.  Had to have some work done to one of the walls in the studio and due to the dust that's going to be created I've slowed down my art making.

I did create a new 4x6 Amur Tiger linoleum block that is carved and ready to print.  (Waiting til the wall is finished so that the dust doesn't settle onto the ink)

I'm also working on a new registration jig that will fit the Oaks Theater block.  My current one is too small (works best for 4x6 and 5x7) so my new one will work better with 6x8, 8x10 and 9x12's.  I've glued it together and now I just need to get some longer screws and drill out the peg holes.

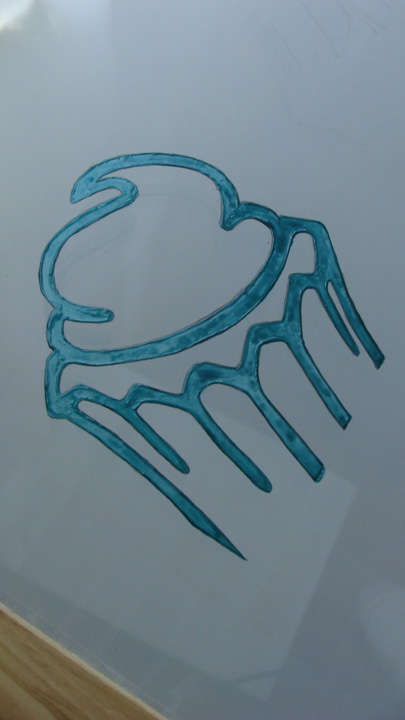
I also did touch up work on the black outline screen for my cupcake screenprint.  I'll look at it again tomorrow morning to see if I missed any areas.  I'm trying to get some of the small errors that occurred during my hand application of the drawing fluid to the screen.  Since the drawing fluid is applied via a paintbrush I sometimes make little dips in and bumps in the designs outlines.

Also working a lot on the computer by editing and cropping photos for newer projects.  I've been wanting to try a more urban themed linocut.  So I've been looking through my pics of Pittsburgh and the other various citites that I've visited looking for just the right types of pics.

I'm ready to get back to consistent work

Thursday, June 18, 2015

15 Minutes of Fame


Andy Warhol said everyone gets their 15 minutes of fame.  I'm supposing that this is mine.  My 4 color screenprint "Buttered Popcorn" on the Andy Warhol Museum Tumblr page.

Monday, June 15, 2015

Cozy Cone Final 8 Color Reduction


Final Cozy Cone Motel 8 Color Reduction Print

Registration with that many colors starts to become an issue and unfortunately the pegs that I place the paper on have become loose with multiple uses.  Registration is off on almost every print and it's really noticeable up close.  From far away it looks decent, but once you get up close you can see the flaws.

It was a great learning experience and I have a better understanding of what I'll need to do next time to make sure it's registered better and better plan out the colors.

Friday, June 12, 2015

Cupcake Update


Finished cleaning out the cupcake outline screen and pulled a test print this morning.

I was looking for little areas where ink would seep through leaving tiny dots of color.  This is the first time that I've never had any.  Time to use some screen filler to clean up the lines and I'll be ready to finish the first set up cupcake prints.

Thursday, June 11, 2015

Cozy Cone Lino Update

These are images of the block after the final carving session.  I just finished carving away the letters of "Cozy Cone" in which I have just left the neon tubing shadows which will be printed this Saturday.  I also carved away the section of the sign around the "Motel" portion as well.

Very excited to have this project finished.  It was trying at times, but as it nears it's end I'm happy that I chose to do it.  Excited to see the black printed finally.


Cupcake Silkscreen Print update

Cupcake Outline Preparation

Working on finishing my cupcake print.  Hadn't yet prepared a screen for the outline so I decided I wanted t get a good bit done today.  I don't usually like to draw onto my screen with pencil (worried I'll poke through it), but sometimes it's just easier.

I use Speedball drawing fluid to fill in the lines and then finally I'm going to use a screen filler which will act as a barrier that the ink will not go through.

Tiger Lino Alterations

This is an update to the Amur Tiger Linocut that I made the other day.  I wasn't totally happy with the heavy detail so I carved some of the areas away.  This is the new version.

I still am not totally happy with the result so some more carving will take place.  I can't carve a lot more away or I will lose parts of the image.  Being that this was basically a test print to see how it would work out I'm not totally disappointed since I'm learning as I go.

Monday, June 8, 2015

Amur Tiger Test Print - Work In Progress

I just recently finished a quick 4x6 linocut of an Amur Tiger.  I see it as a piece that continues to need some work.  Below are some images of it's Work In Progress.  The photo reference was taken by myself during my last visit to the zoo.

Photo Reference - Amur Tiger (Pittsburgh Zoo)

Traced photo reference onto acetate and then traced that again using a 4B pencil onto standard printer paper.


Final 4B drawn image

I then run the 4B drawn image and the lino block through an etching press to transfer the image.  I then trace the whole image with a Sharpie Marker.

Carving away the very tiny details.  I do believe that this should've been done on a much larger block with a much larger image.  The carving took 4 hours due to the amount of tiny detail.

Test Print - Not sure I'm all that fond of how busy it is underneath the head.  It was my first attempt at adding shadow via hatching on a linocut.  I will probably take some time to see about alterations to reduce how busy that area is.